
Elementary Self Portrait lesson plan
http://www.teachkidsart.net/self-portrait-workshop-paul-klee/
Self-Portrait Workshop — Paul Klee
Here is a sampling of self-portraits inspired by artist Paul Klee (including one in progress) from my last teacher workshop. Paul Klee (1879–1940) was a Swiss artist known for his highly individual, abstract style. His work was influenced by many different art movements, including Expressionism, Cubism and Surrealism. This project uses squares of “bleeding tissue” for it’s vivid colors. If you haven’t tried this technique yet, you really must!! It’s so much fun.… even for adults! I originally found this idea on the always inspiring blog “Art Projects for Kids”. I changed it a little to focus more on realistic proportions, but check out both ways of doing it and see which you like best! Here’s how we did it:
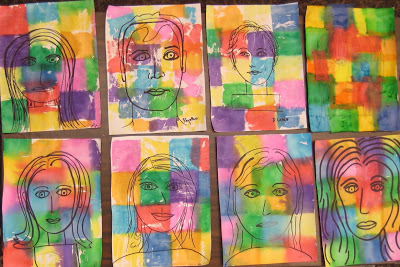
Materials:
9x12 white construction paper
Black chisel tip marker OR black crayon
Mirror (for self-portraits)
“Bleeding” tissue paper in bright colors, cut into squares and rectangles
Watercolor brush
Water and containers
Directions:
After watching you demonstrate, have students draw a very basic self-portrait (see instructions in previous post). Encourage the use of stylized shapes, simple lines and minimal detail. I like to have Kindergarteners draw directly with their marker or crayon, but older students may choose to draw with pencil first and then trace over their drawing. The point is not so much to create a “realistic” portrait as it is to create a simple line drawing, so if the proportions, etc. are a little off, so much the better!
Place a piece of tissue paper on your drawing and use a paint brush to paint over it with water. Repeat with contrasting colors until the entire paper is covered with pieces of wet tissue paper and no white paper is left showing.
You may wait for tissue to dry before removing it, or simply take it off as soon as it has had a chance to bleed its color onto the paper.
Closure:
Ask students what makes their self-portrait “abstract”?
Have students compare and contrast their self-portrait with those of other famous artists. Is their self-portrait more abstract or less abstract? Why?
Middle School Self Portrait lesson plan
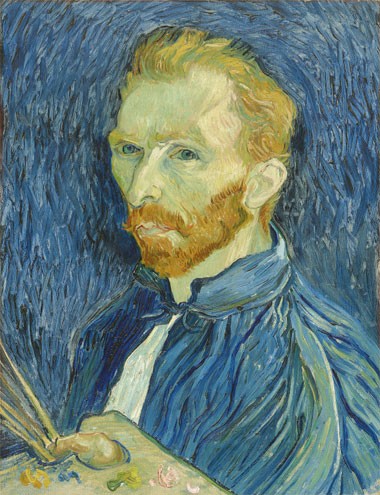
Van Gogh’s Self-Portraits
Grade Level: 5–8
Students will examine Vincent van Gogh's self-portraits and letters to better understand the artist’s life story and personality. Then, they will paint two Van Gogh-style self-portraits to show two parts of their own personality and write a letter describing the one that reveals their “true character” best. This lesson also contains opportunities for French language integration.
NAEA Standards (Instructional Objectives)
1-B Students intentionally take advantage of the qualities and characteristics of art media, techniques, and processes to enhance communication of their experiences and ideas.
3-A Students integrate visual, spatial, and temporal concepts with content to communicate intended meaning in their artworks.
6-B Students describe ways in which the principles and subject matter of other disciplines taught in the school are interrelated with the visual arts.
Curriculum Connections
Language Arts
Foreign Language (French)
Materials
Smart Board or computer with ability to project images from slideshow
Student photograph (tell students several days before the lesson begins that they will need to bring in a photo of themselves)
Photocopier
Scissors
Backing paper or cardboard
Glue
Tempera, poster, or oil paint/pastels
Writing materials
Warm-up Question
Why do artists make self-portraits?
Activity
Students will make two self-portraits in the guise of Van Gogh on separate days to show two different sides or moods of their personalities:
Students (or teacher) will make a light photocopy of their photograph (such as a school or sport picture). They may want to enlarge it in order to have plenty of space for "Van Gogh" brushwork.
Using one color in varying hues, students will paint the entire background paper using Van Gogh-like brushstrokes.
Next, students will cut out their photocopied portrait—both face and clothing—to make a silhouette. This cut-out will be glued onto the painted background.
Lastly, students will use a complementary color to their background to paint over their photo image using different types of brushwork in varying hues by adding white or black. For example, if their background is in yellows, their portrait should be painted with purples, reds for greens, oranges for blues, or vice versa.
On another day, students will create a second self-portrait following the same instructions, but change the colors and types of brushstrokes to show a different side of their personality.
Art History Resources:
http://www.vangoghgallery.com/misc/selfportrait.html
High School Self Portrait lesson plan
| Watercolor Self-Portraits Lesson Plan Drawing and painting the human face can present challenges to beginning students of art. The proportions are generally the biggest hindrance to successful portraits. This project will allow students to explore facial proportion, practice working in transparent watercolor, and produce a large, colorful, self-expressive portrait of themselves. Grade Levels High School/Beginning Art Time Required One to two weeks (5 – 10 class sessions) Lesson Objectives
1. 18" × 24" Watercolor Papers or all-purpose white Drawing Papers and Surfaces. 2. Watercolor Brushes 3. Transparent Watercolors 4. School photos of each student or "instant" photo portraits produced in class. Procedure If using instant photos, tightly frame the student's face as they look straight into the camera. A front facing (full-face) photo will work much better for the following rules of proportion. Sketch a large, slightly egg-shaped oval with the small side toward the bottom of the page. Leave only enough room below the oval to later add the neck and shoulders. Leave room at the top of the paper for hair. Draw a vertical line through the center of the oval. This is the center line. Draw a horizontal line halfway between the top and bottom of the oval. This is the eye line. Draw a horizontal line halfway between the eye line and the bottom of the oval. This is the nose line. Draw a horizontal line one-third of the distance below the nose line and the bottom of the oval. This is the mouth line. The top of the ear on each side of the head is even with the eye line. The bottom of the ears are even with the nose line. After examining the photo, the students will begin to draw the lines that will form their self-portrait. Have them include areas where shadows appear. Point out to them that shadows form shapes and that shadows aren't black. Since the portrait will be finished with transparent watercolor, lines should not be too dark. Assessment Each finished portrait should demonstrate facial proportion as described in the lesson. Watercolor technique should be appropriate to the grade and ability level of the student. Judge whether the student has attempted to do more than the basic exercise as described in the lesson in areas like color, expression, and composition. | 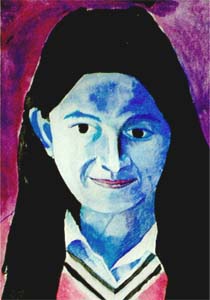 |
 RSS Feed
